Cyanotype Camera
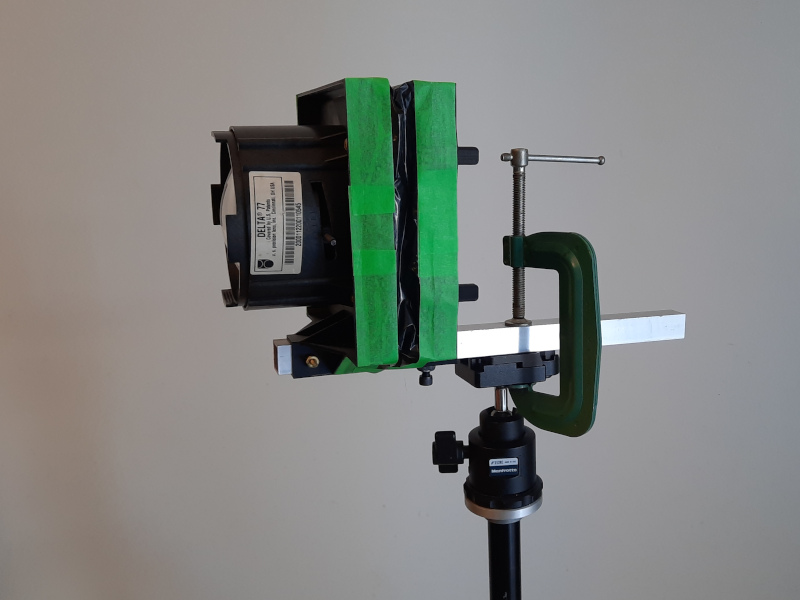
Someone down the street threw out an old rear-projection television, so I tore the lenses out of it and made a camera out of one of them. It can capture images on cyanotype paper and cyanotype gelatine on glass.
Rear-projection TVs were an oddity from the 90s. In principle, a conventional CRT could be made with a 60 inch viewing area, but the depth of the tube, weight, and energy consumption would make it useless to the average consumer. RPTVs got around these limits by having three small CRTs focused onto a rear-projection screen with an arrangement of of lenses and a large mirror. There was one CRT for each colour, with a big lens sitting on top each one. These behemoths disappeared after the introduction of affordable flat screen TVs. I don’t think they are missed.

I wasn’t able to find any information on the salvaged lenses. They are branded as “Delta 77”, and the aperture at the rear is 8cm. They focus on a point about 3cm behind the flange. There is a focus adjustment but it’s very stiff, meant to be set at the factory.
The first step was to get some pretreated cyanotype paper and make a prototype out of some foamcore. The lens turned out to gather enough light: an exposure of two and a half hours would yield a well-defined image.

I designed a the camera components in OpenSCAD and had them printed by a commercial service. The lens mount and plate carrier sit on a piece of square tube. The tabs on the back of the plate carrier are for elastics to keep the medium in place. The carrier will accept a four by six plate.
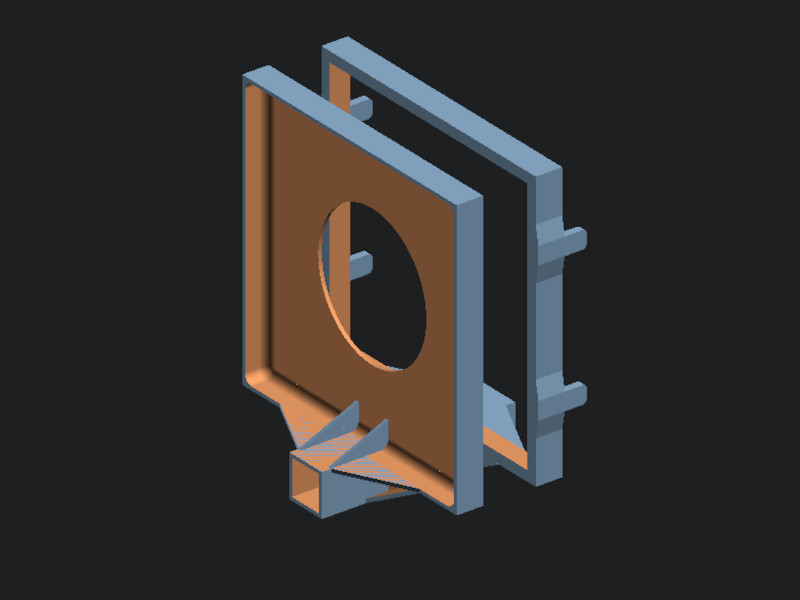
The lens mount is mounted to the rod with a bolt. The carrier can be moved back and forth, and fixed in place with a set screw, epoxied on the bottom. The bellows is made from a doubled-up garbage bag, the appropriate material to pair with a lens found in the garbage. I made a focusing screen with some frosted vinyl taped into a foamcore frame.
In practice it proved impossible to get the two parts of the camera to be exactly parallel. I made the guideways for the rod too large, leaving too much wiggle. The lens is very heavy and the mount is not quite stiff enough to keep from drooping. It has a very shallow depth of field, so this misalignment makes focusing on anything close next to impossible. There also needs to be a better way to keep the plate in place. That said, it can still produce an image.
I ruined my first attempt at cyanotype on glass by rinsing it it water that was too hot. The gelatine all separated form the glass. A second attempt went better:

The emulsion coat on the plate is very uneven because I left standing up to dry. There are a lot of bubbles, probably the result of the gelatine being too warm or not warm enough. Or perhaps from being agitated too much or not enough. Or it’s just in a mood.

A subsequent attempt was more successful. Scanned, desaturated and inverted, it does indeed look like a snowy yard:

This plate, contact printed on watercolour paper coated with cyanotype formula:

Too dark, but you get the idea.
If any of this interest you, be sure to look at Aline Héau’s dreamlike cyanotypes. She is a master of her craft. Nicole Small has posted some of her interesting work with the medium. Both these artists have also shared their results when things go wrong. A welcome reminder that the first step toward being good at something is to be bad at it, and even pros have bad days.
For the emulsion, I am using one 7g packet of Knox gelatine mixed with 30ml of Jacquard cyanotype formula A, and 30ml of formula B. I prepare the emulation in a double boiler heated to 50°C. Consistent results elude me, much more experimentation will be required before I can get evenly coated, bubble-free plates. I started with instructions from here.
A big thank you to my wife. She told me to do something with the lenses or get rid of them.